
The Skills Fest User Guide
A step-by-step walkthrough for setting up your organization and running an event. Screenshots use demo data. Prefer to ask? The product guide at the bottom answers questions directly.
Getting started
The Skills Fest is built around two things: your organization (your private workspace) and the events you run inside it. Each event has timeslots, rooms, and classes that your members register for. Here's how to get set up.
- From the home page, choose Create your organization. You start free — no code required. (Have an access code from us? Enter it to unlock a complimentary paid plan.)
- Pick the template that's closest to your group. It pre-fills your vocabulary and a starter catalog — you can change all of it later.
- Follow the short setup guide. Fill it in yourself, or choose ✨ Use the AI assistant to have it drafted — you review and apply each part, and nothing saves until you say so.
You land on your dashboard, with your clubs, members, events, and settings in the left sidebar. (Already have a signup code from a leader? Use Join with a code instead — that registers you as a member, not an organizer.)
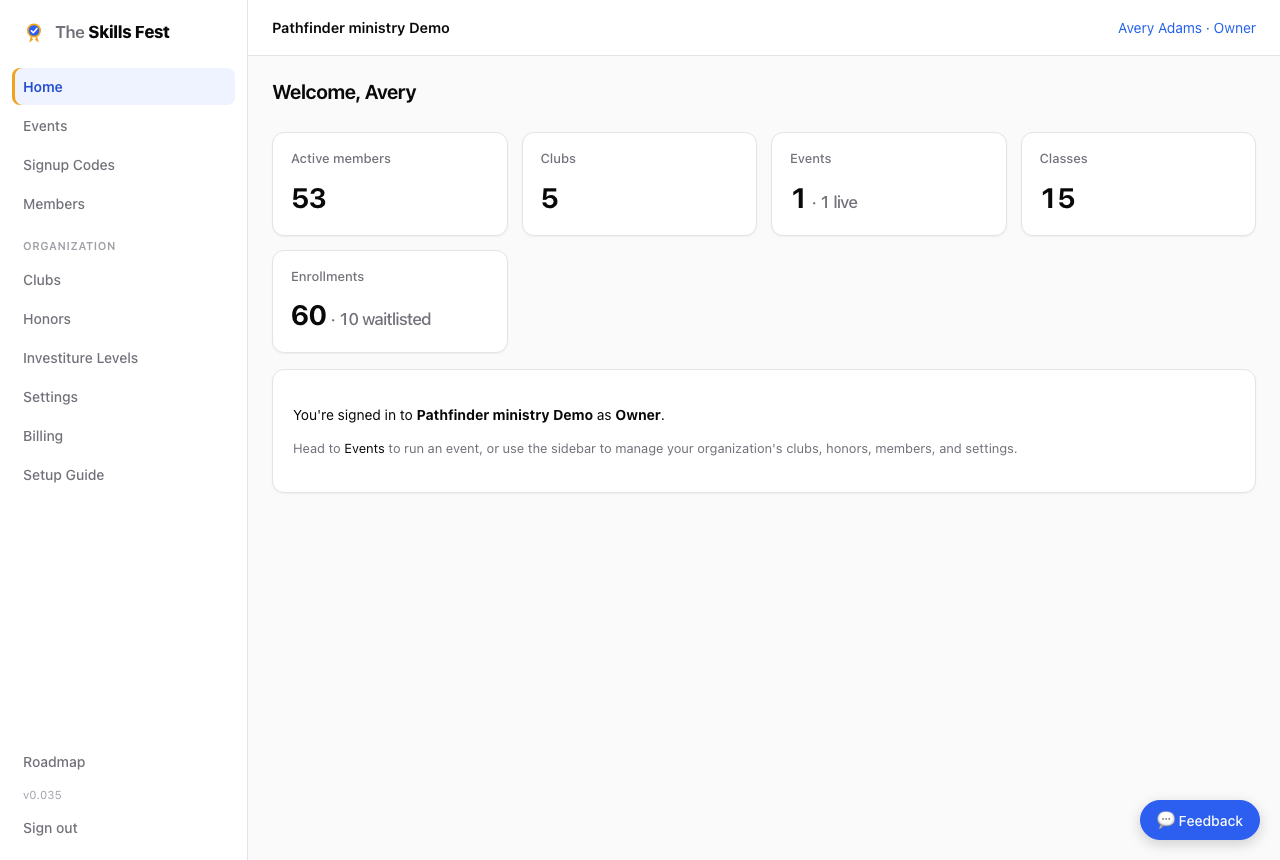
Set your terminology
The app speaks your language. Every label — the small groups (Club, Troop, Pack…), the kids (Pathfinder, Scout, Explorer…), the awards (Honor, Merit Badge, Adventure…), and the levels or ranks — is renamable, and your words appear everywhere: menus, buttons, and reports.
- Go to Settings in the sidebar.
- In the Terminology card, type the word your members already use in each field. Leave a field blank to keep the default shown as its placeholder.
- Click Save changes. The whole app updates instantly.
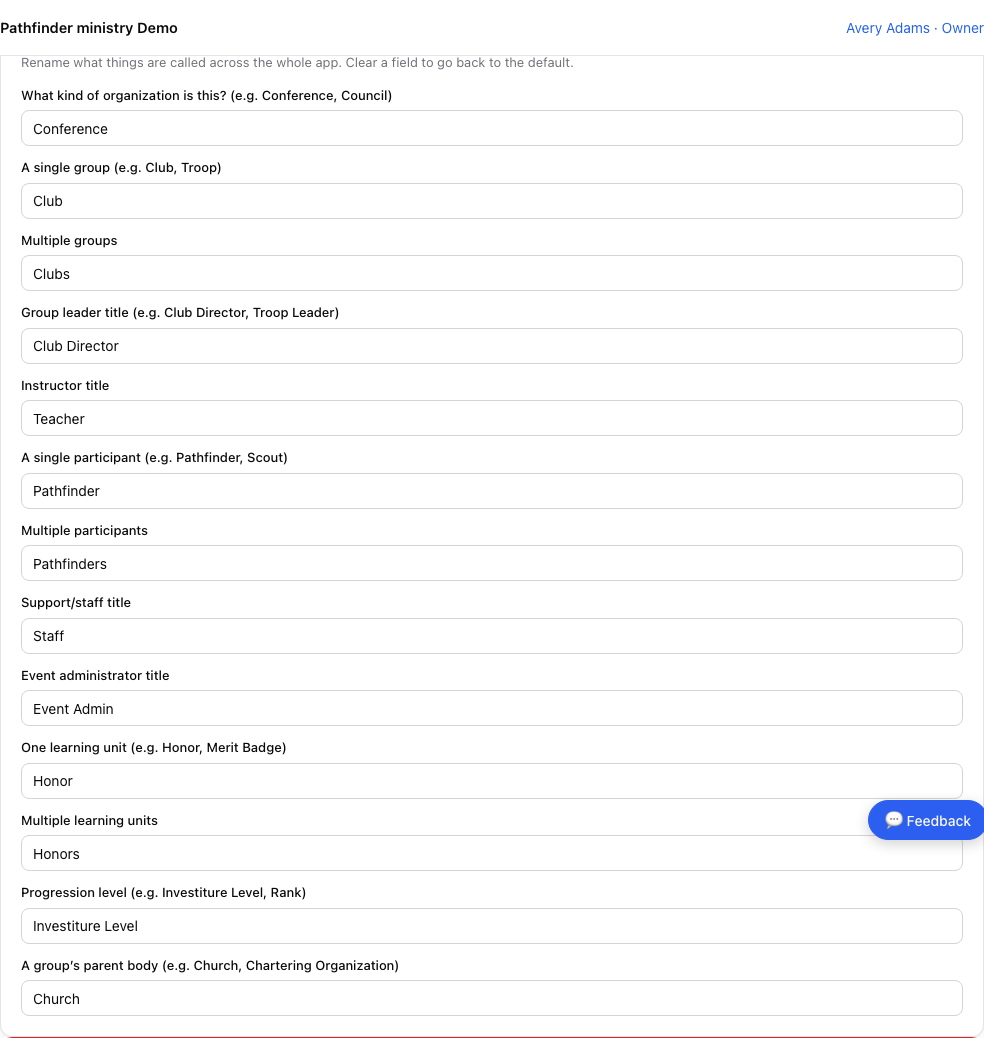
Build an event
An event is a day (or weekend) of classes. Building one is a short wizard: details → rooms → timeslots → classes → clubs & codes → review.
- Open Events and click New event.
- Name it and set the dates. (Prefer to describe it in plain English? Choose ✨ New event with assistant and it drafts the whole schedule for you to review.)
- Add your rooms (locations) — each has a capacity and an optional limit on how many classes it can hold at once.
- Add your timeslots — the named blocks of time your day is divided into. Every class lives in exactly one timeslot, so this is the schedule's backbone.
- Add classes, mark which clubs are attending, and review. Then open registration.
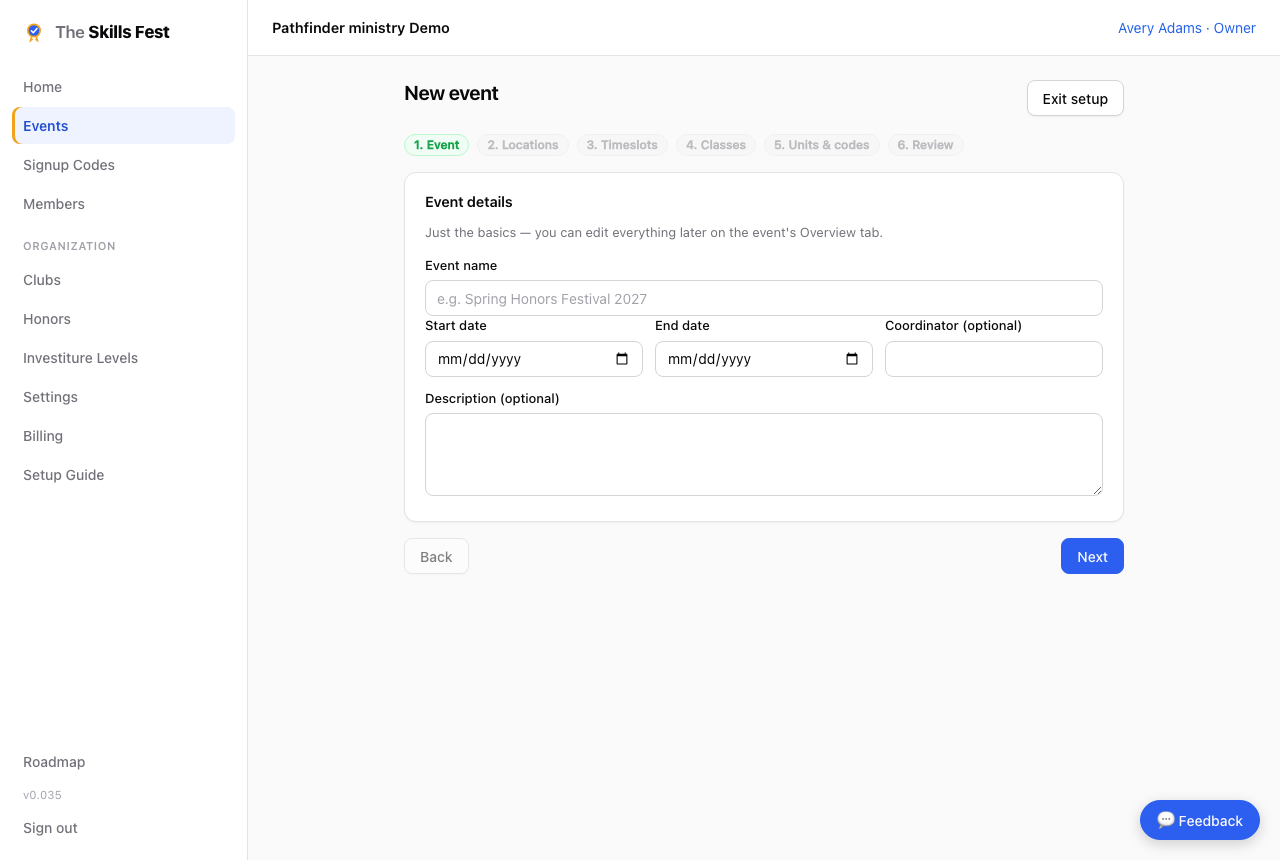
You can always come back to an event's Setup tab to add or edit rooms and timeslots later.
The schedule grid
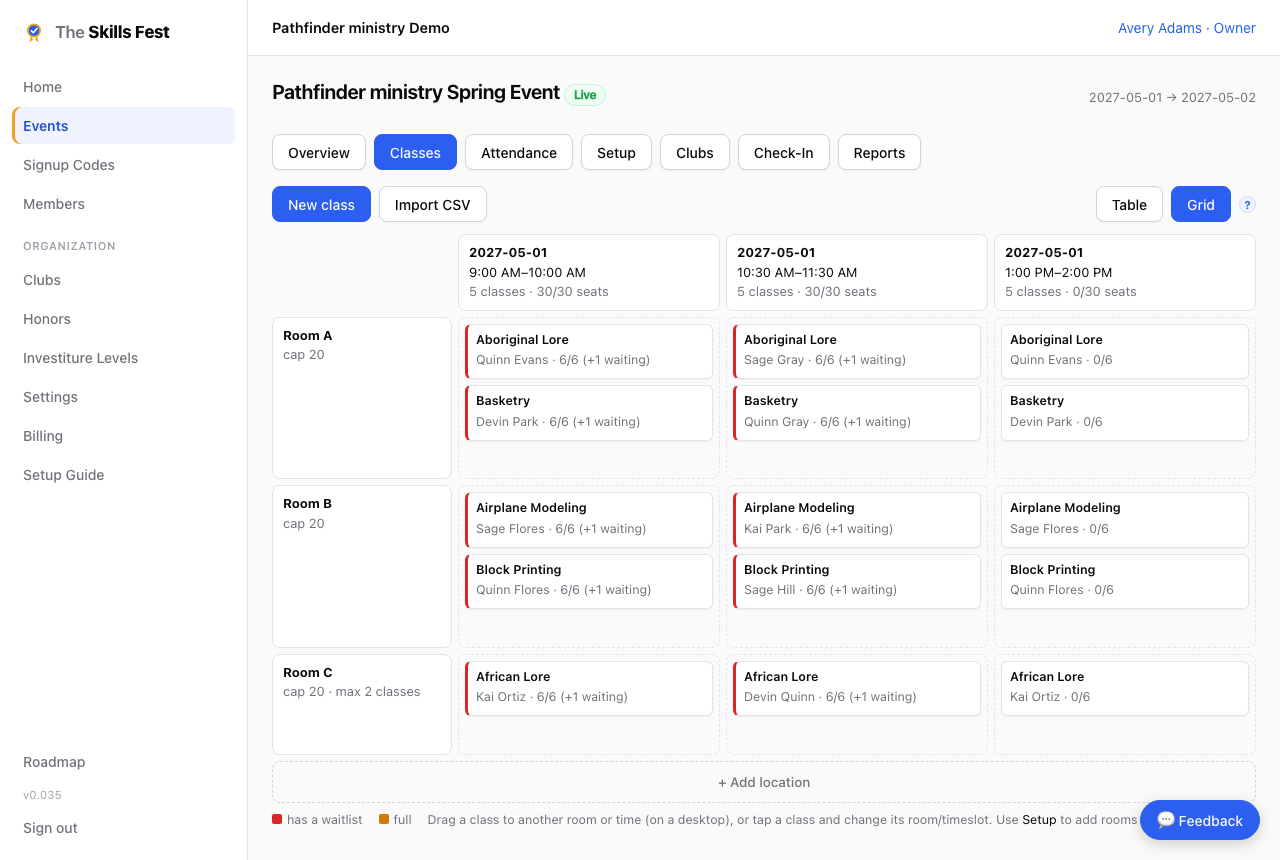
On an event's Classes tab, switch to Grid for a room-by-timeslot board: rooms down the side, timeslots across the top, each cell holding the classes in that room at that time.
- Click an empty cell to add a class there.
- Click a class to edit it.
- On a desktop, drag a class chip to another room or time. On a touch screen, tap a chip and change its room or timeslot in the dialog.
A chip's red edge means it has a waitlist; amber means it's full. If a room has a per-timeslot class limit (like Room C below, capped at 2), the grid stops you from overfilling it. Classes without a room wait in the Unassigned row until you place them.
Rosters, waitlists & conflicts
Each class has a course (from your catalog), an optional teacher and secondary teachers, a capacity, an optional minimum level, and notes.
- On a class, click Manage (labeled with your term for participants).
- See the full Enrolled roster and add or remove members.
- When a class is full, anyone you add lands on the waitlist automatically. Remove someone and the first person on the waitlist is promoted into the open seat — no manual reshuffling.
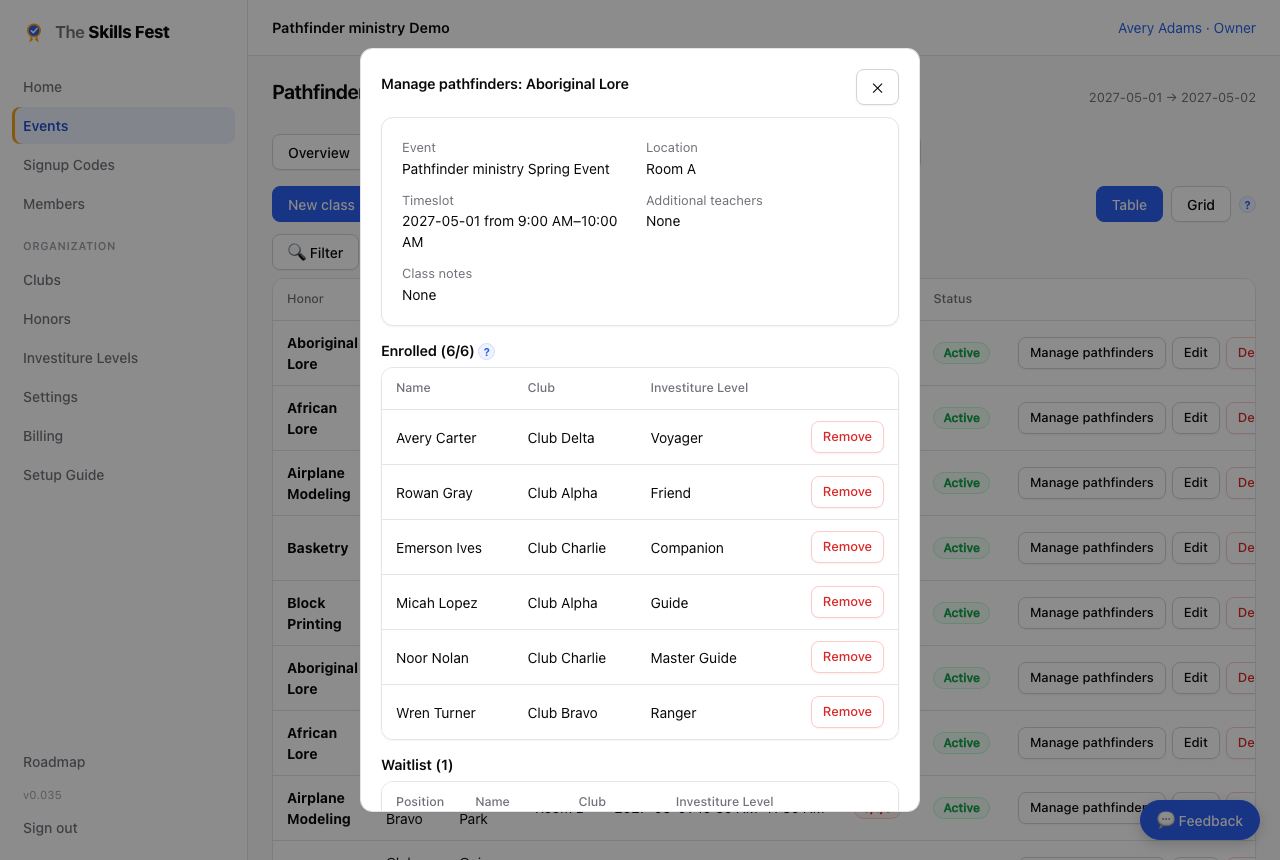
Multi-session classes link several timeslots into one class members attend across sessions, and Duplicate to other timeslots copies a class into more slots at once. The app flags any scheduling conflict before it's saved.
Invite people
There are three ways people get into your event, depending on who they are.
Anything that comes in through a shared link — a signup code or a club invite link — waits on the Approvals page until you accept it. Invites you email to one specific person skip the queue, since choosing to email them was the approval.
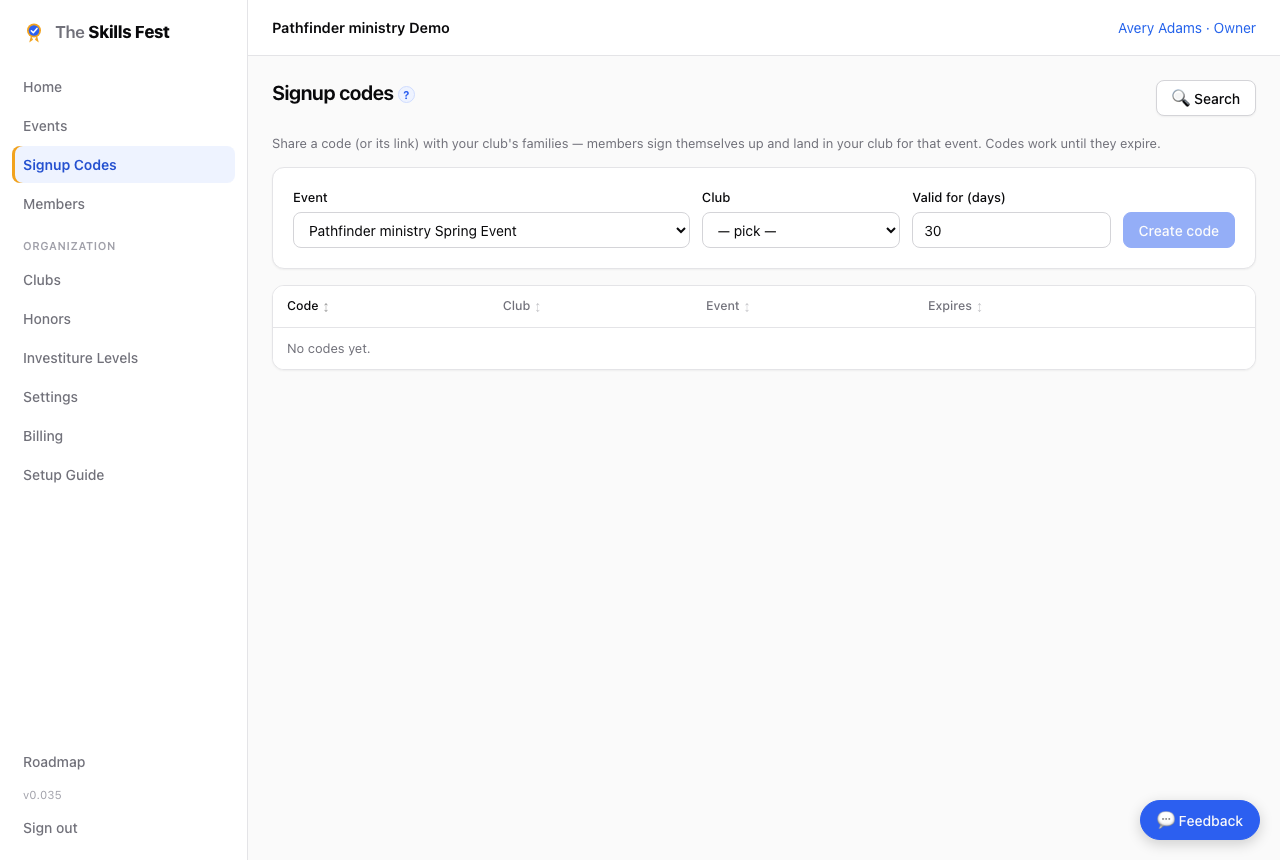
- Families self-register with a signup code. Open Signup Codes, create a code for a club and event, and share the code or its link. Families open it, create a username and password (no email needed), and land in that club for the event once approved.
- Bring in a whole new club with a club invite. On the event's Clubs tab, use Invite a club for a link tied to that event — or, on Members, create the year-round shareable club link that isn't tied to any event. The new club's leader opens it, names their group and creates their account; you approve it and they're in.
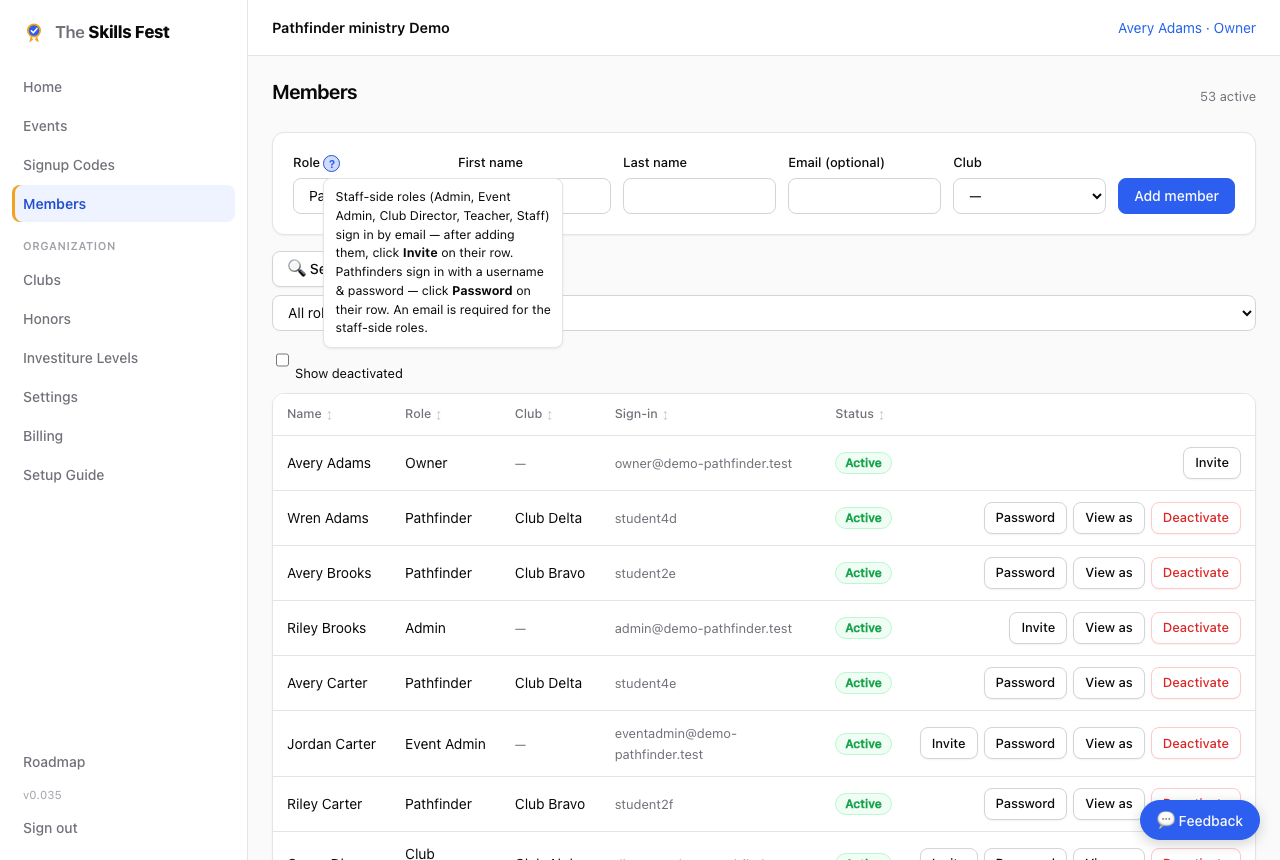
- Add staff and leaders directly. On Members, add them and click Invite on their row — they sign in by email. (Participants get a Password instead of an email invite.)
Roles & permissions
Every member has a role that determines what they can do:
- Owner / Admin — full control of the organization and its events.
- Admin (view-only) — sees everything an admin sees, but can't change anything. Good for board members or read-only oversight.
- Event Admin — manage events, classes, check-in, and reports.
- Club Director / Unit Leader — manages only their own club's classes and members. They add classes without a room (an admin assigns it), can edit but not delete their classes, and can be allowed or blocked from adding classes per event.
- Teacher / Staff — teach classes and mark attendance.
- Participant — register for classes and view their own schedule.
Change anyone's role by clicking their row on the Members page. Switching someone to a staff-side role asks for an email so they can be invited.
Run the day: check-in & attendance
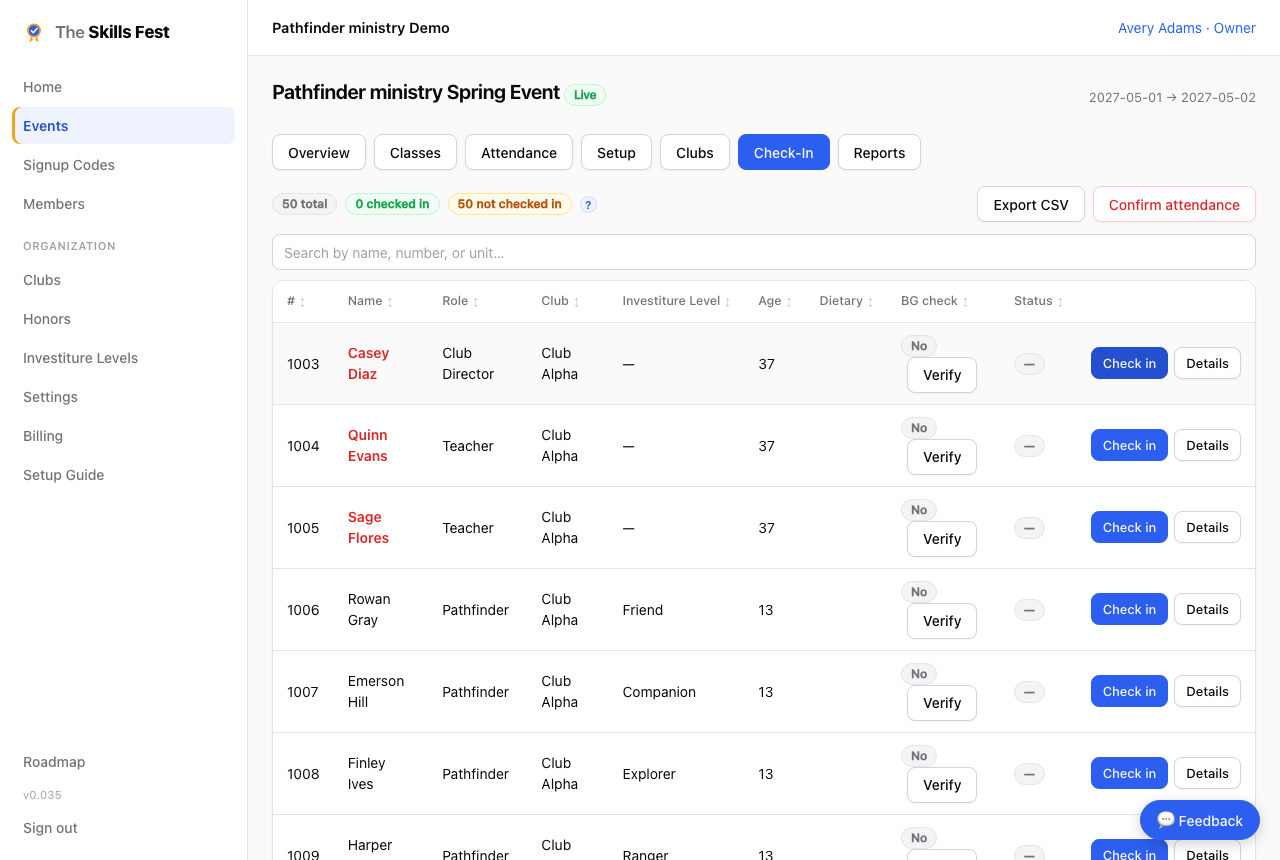
Two different jobs on event day — Check-in is arrival for the whole day; Attendance is who was in each individual class.
- On the Check-In tab, mark each participant present as they arrive. You get live total / checked-in / not-checked-in counts and background-check flags, plus a CSV export.
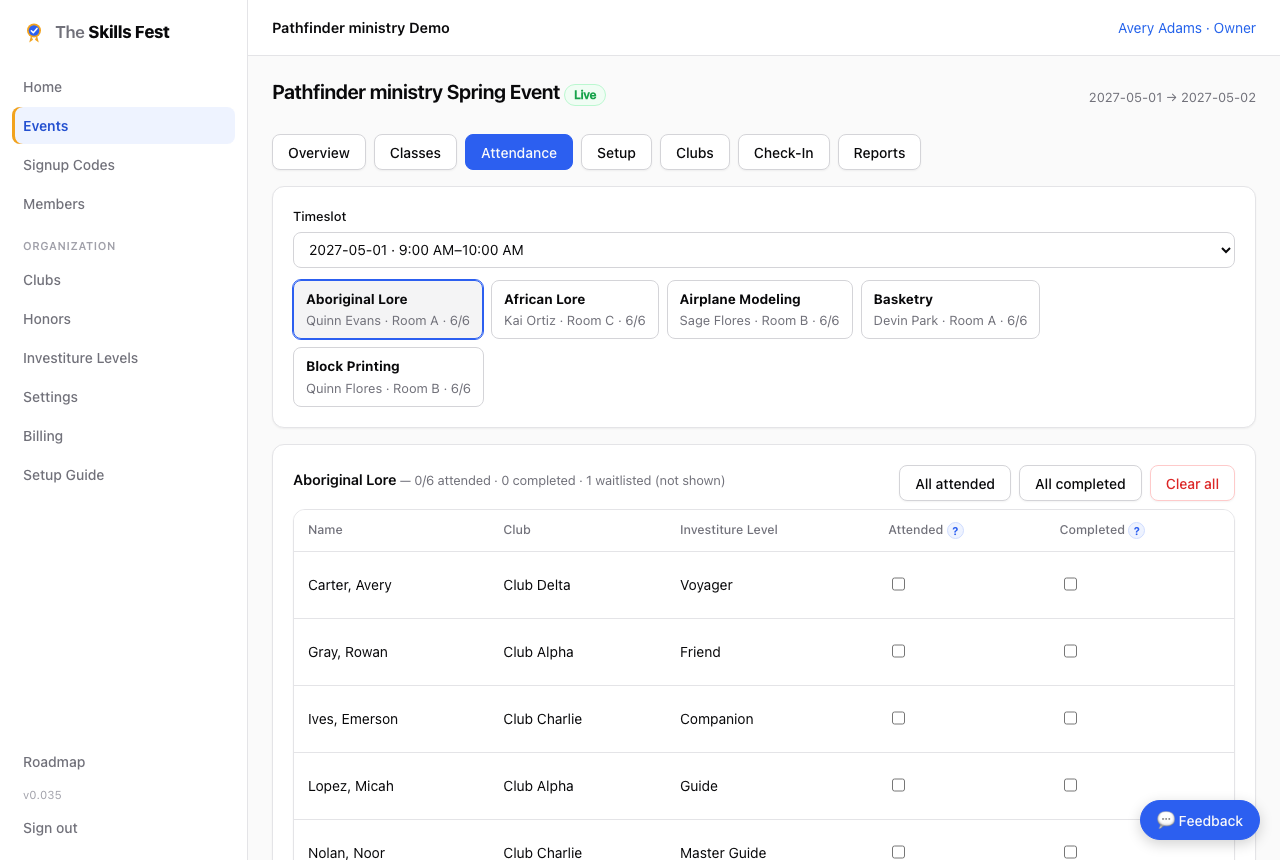
- On the Attendance tab, pick a timeslot, pick a class, and tick who Attended and who Completed — with bulk All attended, All completed, and Clear actions.
Marking someone Completed also marks them Attended (you can't finish a class without being there); un-checking Attended afterward leaves Completed alone.
Reports & exports
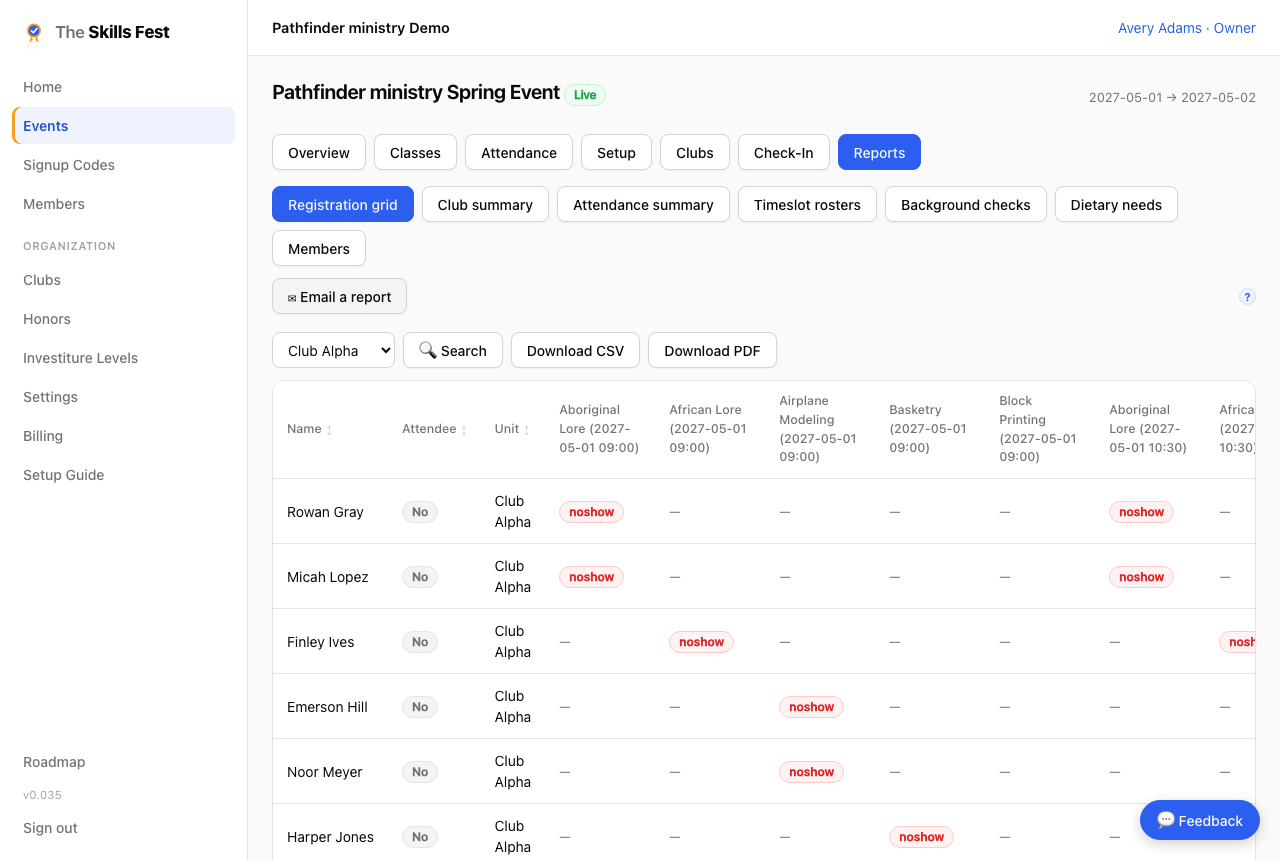
The Reports tab renders each report in the browser — sortable and searchable — with Download CSV and Download PDF on each:
- Registration grid — every member × class with attendance cells.
- Club summary — a group's registration progress and member schedules.
- Attendance summary — per-class attended/completed counts and totals.
- Timeslot rosters — printable class rosters for the day.
- Background checks — adults needing verification.
- Dietary needs — everyone attending who has a dietary need on file, with a count summary for catering.
- Members — a full member export.
Need to hand a report to a coordinator? Click ✉ Email a report, pick the report and format (PDF or Excel/CSV), and type any address — it sends straight there, no download needed.
Lodging
Lodging is an optional add-on for overnight events — camporees, retreats, camps. It lets you build your housing inventory, assign every attendee to a room or cabin with the rules (capacity, gender, youth/adult) built in, and print rosters. It's renamed to whatever you call it — Housing, Cabins, Dorms.
An organization owner turns it on under Billing (or by redeeming a code), then enables it for a specific event from that event's Lodging tab. Once enabled you get three tabs: Inventory, Assignments, and Roster.
- Inventory — add your buildings and the rooms inside each. A room has a capacity and can be limited to a gender (male / female / any) and an occupant type (youth / adult / family / any). Copy an inventory from a previous event in one step, or describe it in plain English and let AI setup draft it for you to review.
- Assignments — the board. The left column lists everyone not yet placed; the right shows your rooms. Drag a person onto a room to place them, or drag them back to the pool to unassign. Search by name to find anyone — matches are highlighted even when they're already in a room. Click the ⓘ on a person to see their details and their room-with request.
- Each room shows occupancy / capacity and its gender/type. Placing someone whose gender doesn't match asks you to confirm first; dropping onto a full room offers a waitlist — when a bed opens, the next person in line is moved in automatically.
- Room-with requests — a participant (or their leader) can note who they'd like to room with. There's no peer picker — members never see each other's names — so it's free text the assigner resolves. You can view and edit anyone's note from the ⓘ info box.
- Auto-assign — choose Auto-assign from the pool, pick whether to place only the unassigned or start over for everyone, and optionally type instructions ("keep the Eagles together", "put leaders near the exits"). You get a preview grouped by room, with anyone unplaced and any rule warnings called out — nothing is saved until you press Apply. Standard rules always apply: gender separation, units kept together, and adults separated from youth.
- Roster — the printable list, grouped by building and room, plus a CSV export. Anyone who has since dropped the event is left off the printed roster (and the count of who was excluded is shown). Unit leaders can see the roster for their own members but do not assign.
Plans & billing
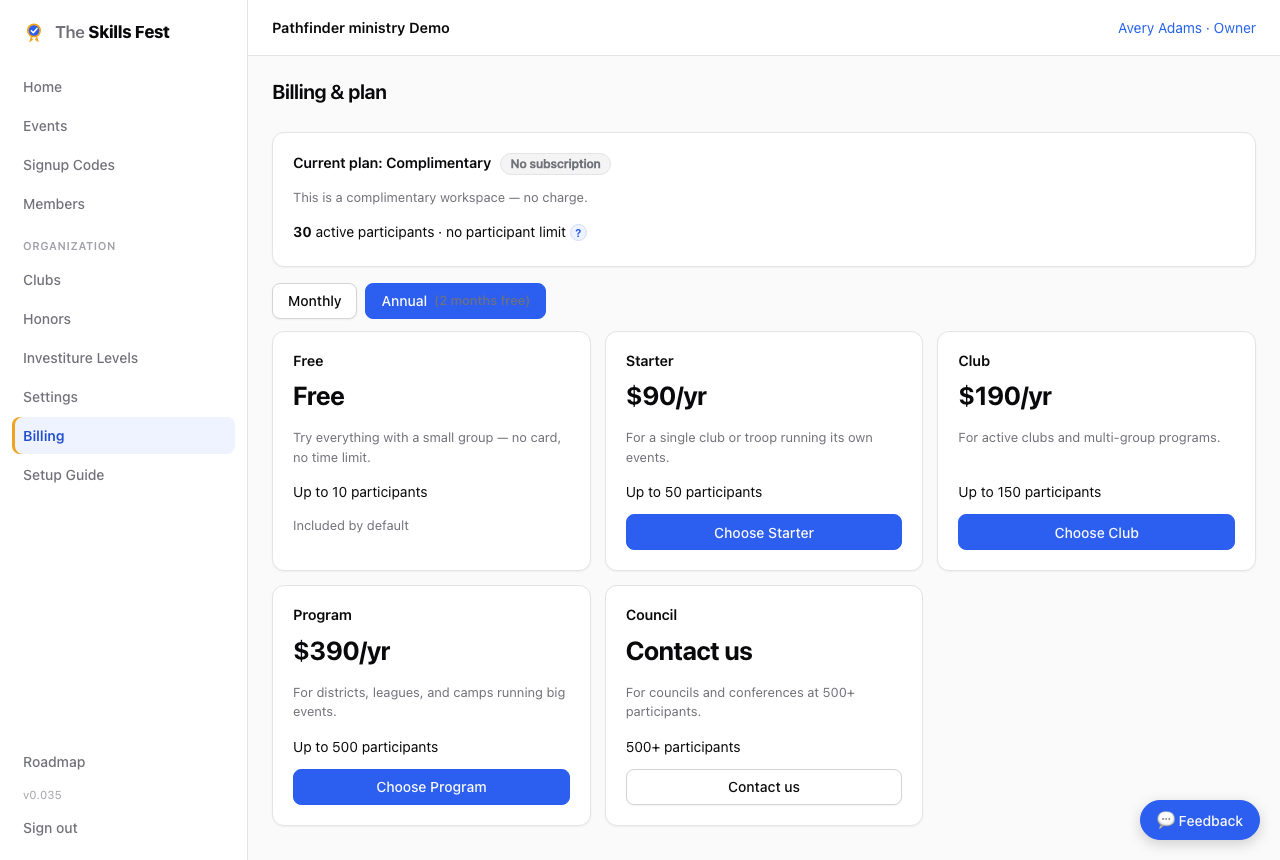
Every organization starts on the Free plan — up to 10 active participants, no card required. Paid plans are a single flat price (monthly or annual) sized by how many people are registered for your events, never per seat: Starter, Club, and Program step up the included participant count, and Council covers the largest programs.
Owners manage everything under Billing: your current plan, how many active participants you have versus what's included, and one-click upgrades with a monthly/annual toggle.
Running seasonally? Pause billing between seasons. On a paid plan you keep full access until the period you've already paid for ends; after that the workspace becomes read-only (your data stays safe and visible, you just can't make changes) until you resume. You can even set a future date to auto-resume and re-bill. Resume any time. Complimentary (comp-code) workspaces bypass billing entirely.
Closing your organization
Done for good? An owner can delete the organization from the Danger zone at the bottom of Settings.
- Deleting locks everyone out immediately and schedules permanent erasure after a 30-day grace period. Within that window, contact us and we can restore it.
- If you're only stepping away for a season, pause billing instead of deleting — your data stays intact.
- A workspace left paused for a full year is archived automatically and removed from access.
Get help
Three ways to get unstuck:
- Hover-help. Look for the small “?” icons next to fields and controls throughout the app — hover, tap, or focus one for a plain-English explanation.
- Feedback. Spot a bug or have an idea? Use the 💬 Feedback button on any page. Track your own submissions, and upvote published ideas on the shared Roadmap.
- Contact us. Need a hand? Reach the team from the Contact page and we'll get back to you.
Still have a question?
Curious how something works? Ask away — this assistant knows the product.
Answers are AI-generated from The Skills Fest's docs. For specifics, see the User Guide.